A few words to get you going:
It has been a while since my last blog post! Well it is time to correct that and share some exciting updates on Azure update and configuration management.
One of the many benefits of the cloud and, often ignored is the fact that you get an opportunity to start over and take advantage of tools and services native to the cloud. An example is Update Management, Inventory and Change Tracking. Traditional on-premise tools used in this area can be costly and complex to implement in a cloud environment. Why not use the native tools?
The general argument is that it is not mature enough or some other variation of it does not do what we need and we are used to our other tools. My suggestion is at least, try it! Understand its limitations but remember that everything moves very fast in the cloud “If you don’t go looking, you will never see it coming”.
One area that I have been exploring is Update management. I have been designing and operating SCCM environments since the SMS 2003 days. I have also been testing the update management solution since its early incarnation as a solution in the Operations Management Suite (now Log Analytics).
Now before you mention gaps, first explore and think about scenarios that fit what the current solution can deliver. In my opinion, there are multiple advantages over the traditional on-premise tools. My favourite features include, ease of enablement and exemption management. More recently the pre and post scripts have added another dimension to what you can do with native Azure Update management service (and it is Free*).
*Well you pay for the Log Analytics data storage. The high-level architecture is below:
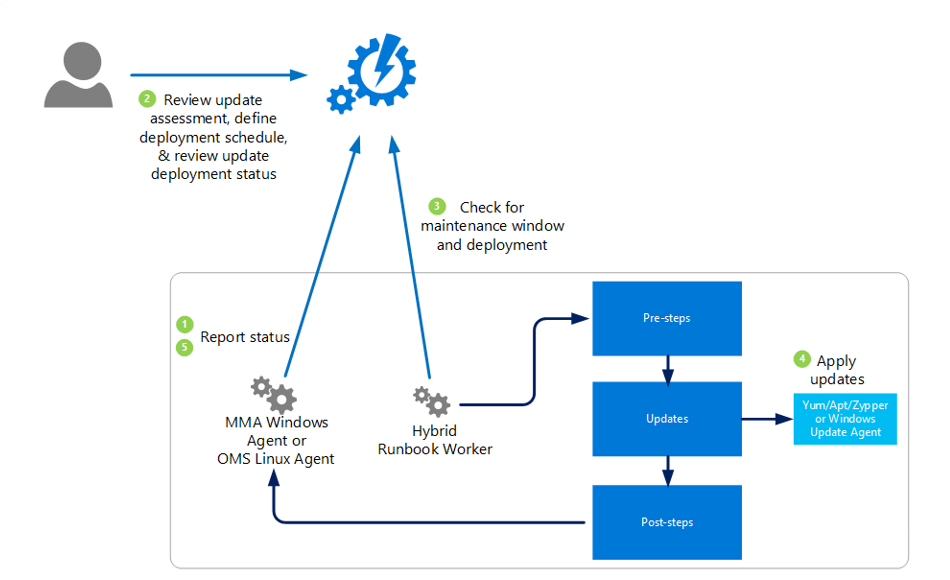
This blog is focused on how to enable management and prepare to deploy updates to IaaS virtual machines. These can be windows or linux machines.
Planning:
Before you dive in and follow the online documentation or just explore, here is a short cut to simply your journey. Update management requires the following
- Access to an Azure subscription with rights to create and manage resources
- An automation account
- A log Analytics Workspace
Optional recommended components
- Dedicated Resource Group
- Custom Dashboard
- Plan for environment tags
I am approaching this blog with a zero to hero mindset. That is, I will be performing most of these steps using the Azure Portal.
Automation account
An Azure automation account is the core component for Configuration management and process automation and a whole lot more in Azure. You can find out more about automation accounts at the following URL https://docs.microsoft.com/en-us/azure/automation/automation-intro .
Create a dedicated resource group for IaaS Management :
Connect to the Azure portal using your favourite browser https://portal.azure.com
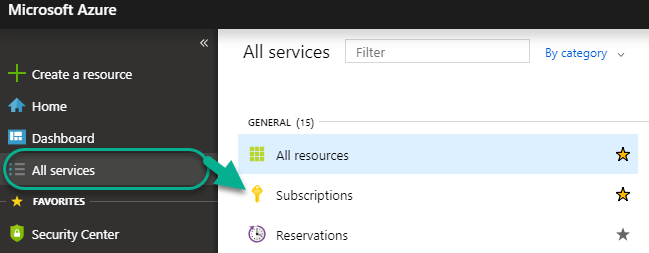
Select All Services in the left hand pane and select subscriptions
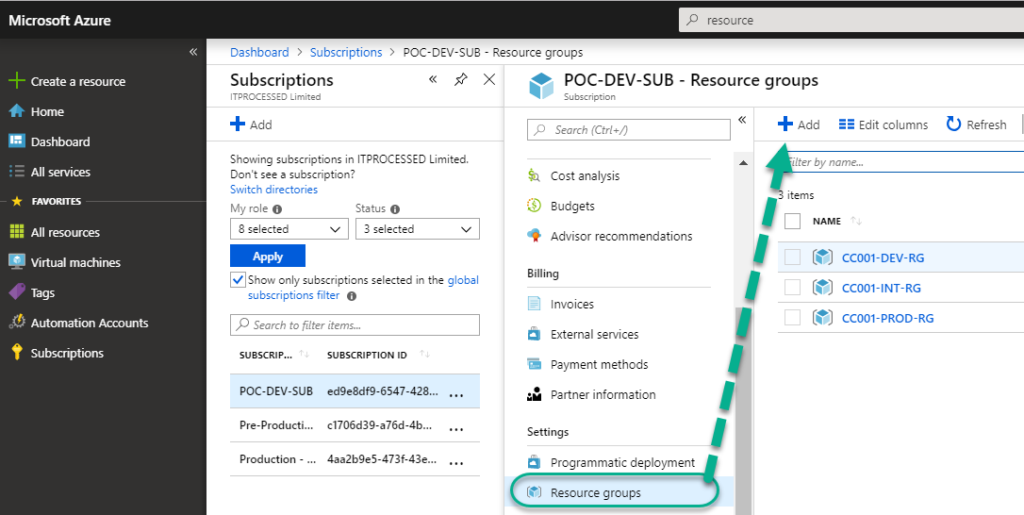
Click the subscription you intend to use for update management | Select Resources groups and click +Add
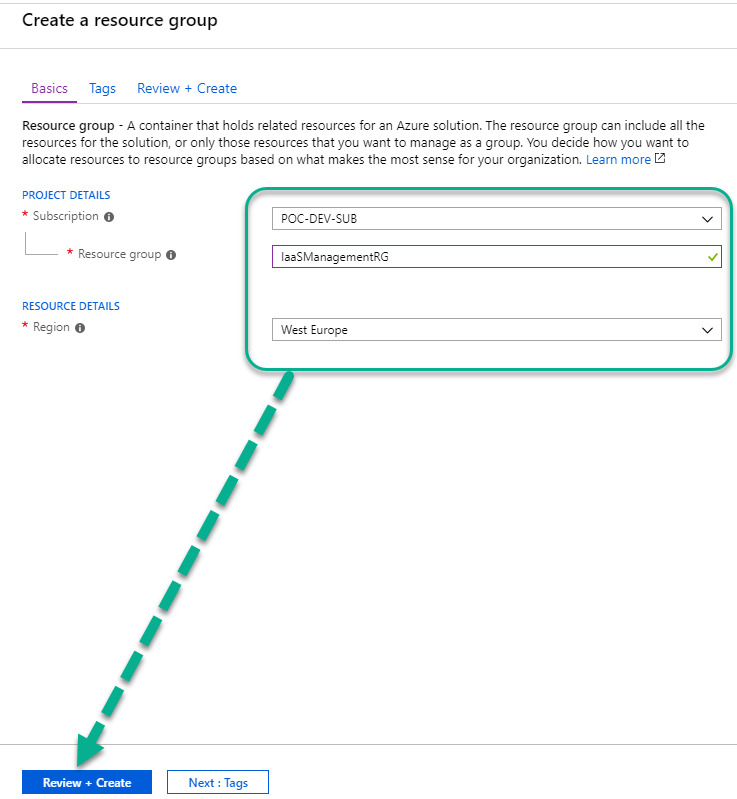
Select the subscription in scope, type a resource group name (in my example IaaSManagementRG and select the Azure Region). Click Review +Create and click Create
Create the Automation Account:
In the Azure Portal, select All Services and find Automation Accounts and click it to open the automation accounts blade
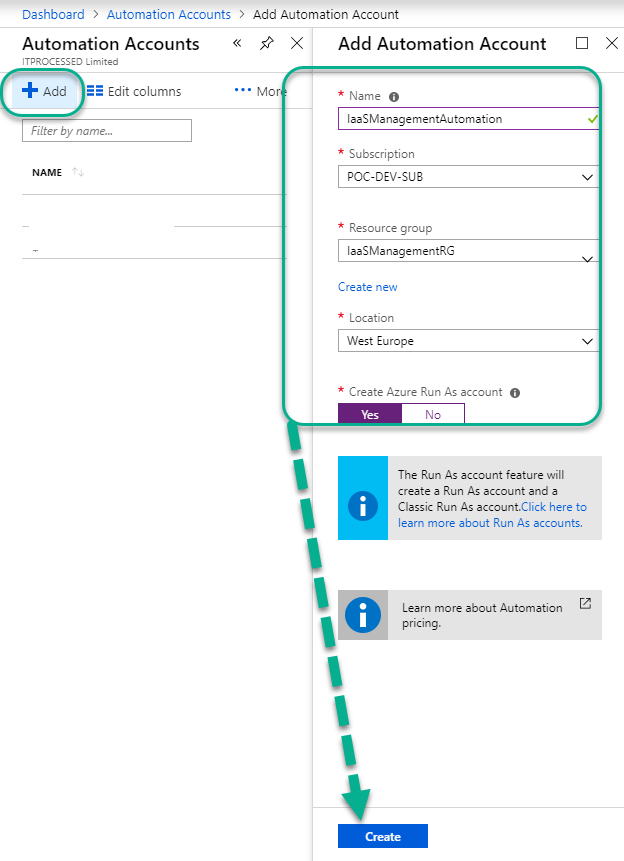
Click +Add to start the process of creating a new automation account
Provide the required details and click Create; in my case the automation account details are
Name: IaaSManagementAutomation
Subscription: Your target subscription
Resource Group: The one you created earlier in this blog (IaaSManagementRG)
Location: Use the same region as the resource group
Create Azure Run As account: leave the default option of Yes
Create a Log Analytics Workspace:
In the Azure Portal, select All Services and find Log Analytics workspaces and click it to open the Log Analytics workspaces blade
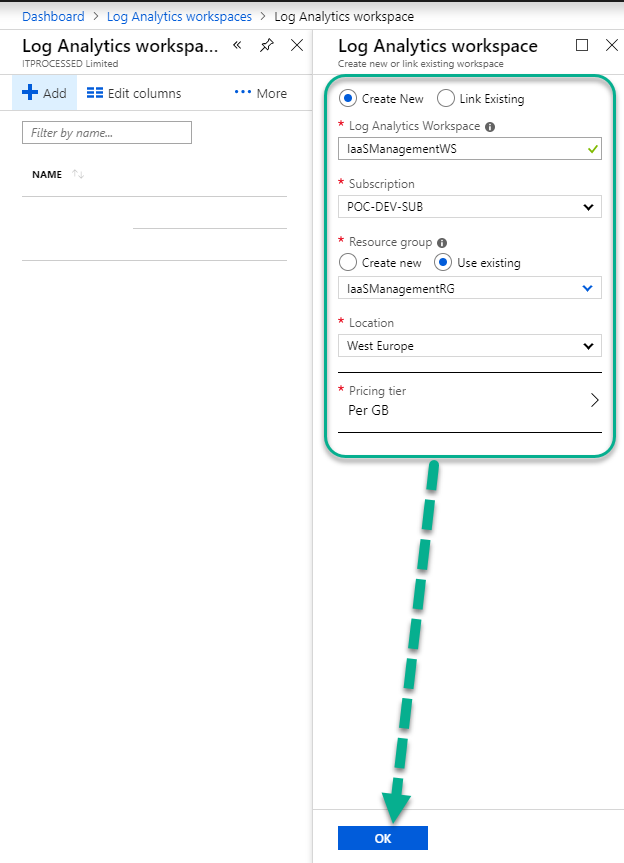
Click +Add to start the process of creating a new workspace dedicated to the IaaS management
Provide the required details and click OK; in my case the Workspace details are
Name: IaaSManagementWS
Subscription: Your target subscription
Resource Group: The one you created earlier in this blog (IaaSManagementRG)
Location: Use the same region as the resource group
Pricing tier: Select the appropriate tier (mine is an MSDN subscription so accepted the default)
Optionally create a dedicated Azure Dashboard
Dashboards in Azure help you to simplify your workspace in Azure. You can create multiple dashboards and even share it with other members of your team. I prefer to have a dashboard dedicated to updates management (Your personal customizable console). See this article on how to create dashboards in Azure for the steps.
In my environment I created a dashboard called IaaS Management and Automation and pinned the automation account, the Log Analytics workspace and virtual machines. You can add additional short-cuts to suit your needs.

Enable Update Management (Automation Account option):
We are now ready to enable Update Management. The steps we performed ensures that the automation account and log analytics workspace are created with appropriate names (your choice of naming). You can also enable update management from the virtual machine settings. I prefer not to use that approach because Azure creates the prerequisites (workspace and automation account) but you lose the flexibility to provide your preferred names for the automation account and workspace.
Select the automation account you created earlier and navigate to the Update Management blade, verify that the right subscription is selected, select the workspace you created and click Enable.
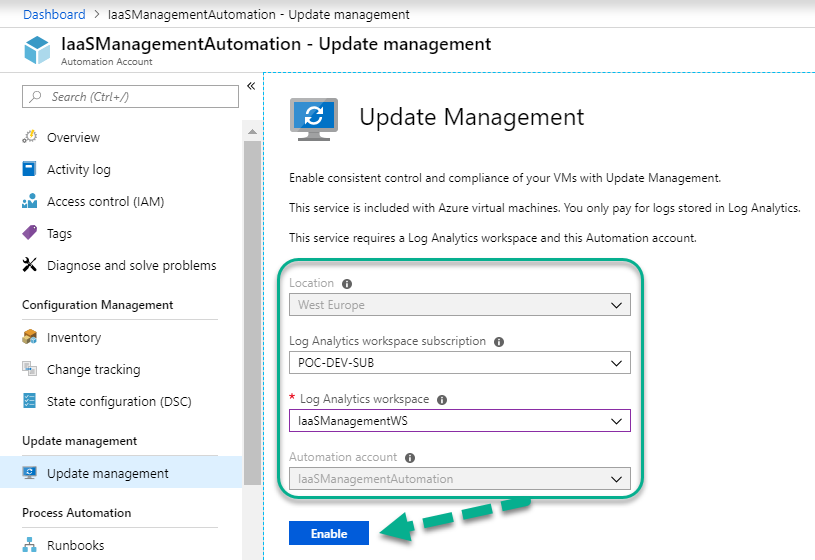
It takes few minutes to enable the service, once complete you are presented with the update management workspace (an example below). Click on the pin in the top corner to pin to your dashboard.

This completes enabling the update management service in Azure.
Enable Inventory and Change Tracking
It is also recommended to enable Inventory and Change tracking as this option will compliment the update management service. Inventory and Change tracking is also enabled using the automation account. The steps for enabling Inventory and Change Tracking is similar to enabling Update Management. In the Automation account you created, navigate to Inventory under Configuration Management; click Enable to initiate the process. This will take a few minutes to complete.
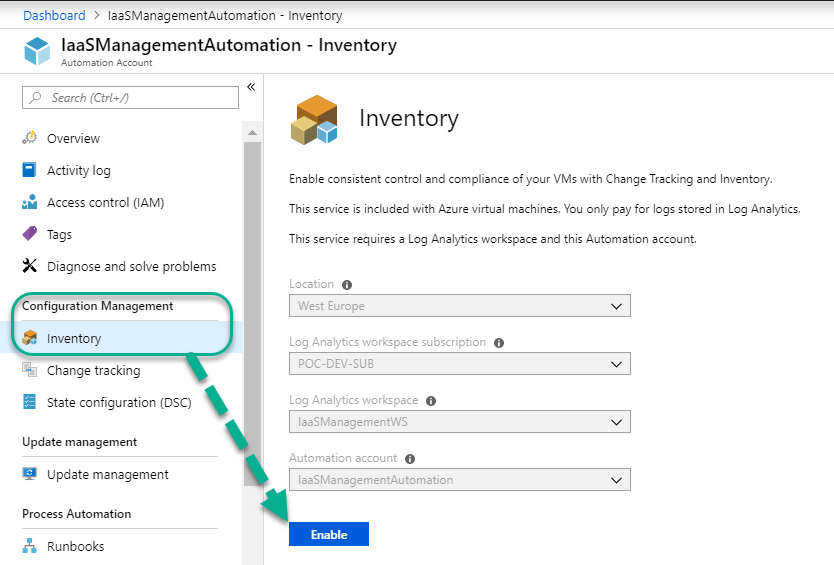
Enabling Inventory automatically enables Change Tracking. Conversely enabling Change Tracking will enable Inventory.


Azure Configuration Management: Change Tracking enabled
Enable Inventory on an Azure Virtual Machine
As with most configurations in Azure, you have multiple options available to you when you need to perform steps. In order to see one of the options available to you when enabling Inventory, we will walk through enabling Inventory management for one Azure Virtual machine.
Select the automation account you created and navigate to Inventory under Configuration Management and click +Add Azure VMs
In my example, I have six machines available but I will only check one machine and click enable to complete the process
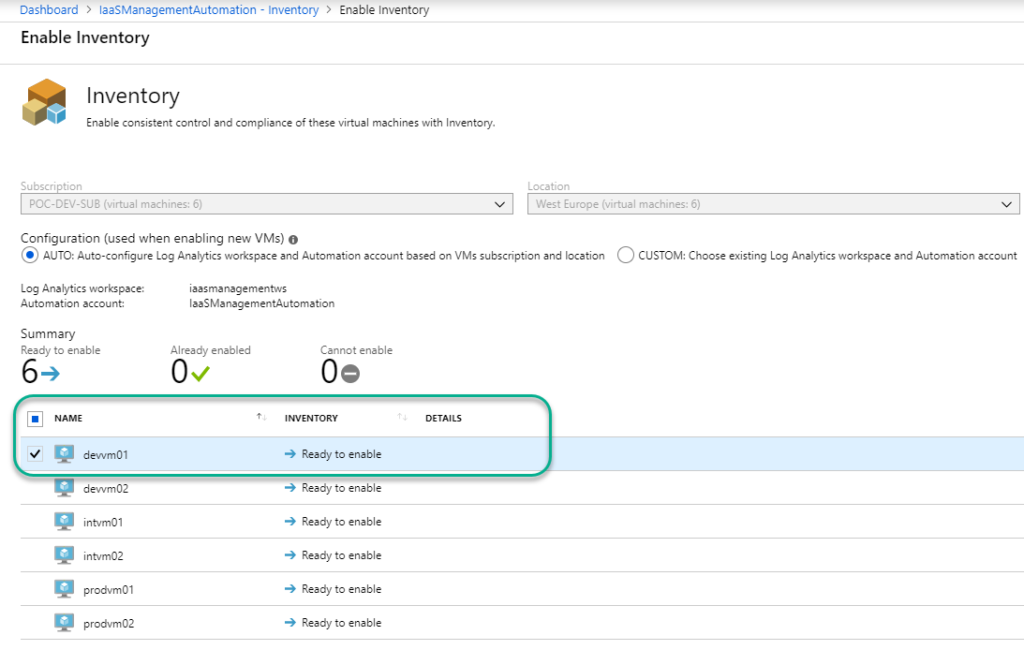
This process can take up to 15 minutes to complete so be patient. The data can take up to 24 hours to show once the enablement is complete.
The next step is to enable the update management agent on the machines in scope. You can use the update management service to manage Azure virtual machines and on-premise physical and virtual machines. The operating system can be Windows or Linux.
Enable Update Management – Azure Virtual Machines
You can enable update management on Azure virtual machines either through the specific virtual machine properties or from the Update Management blade. If there are any machines that have Inventory enabled these will show up in the update management blade as a message to inform you that they are ready for management.

The steps for enabling update management on Azure VMs that already have inventory enabled using the Update Management blade is as follow;
In Update Management under the Automation account; select Manage machines
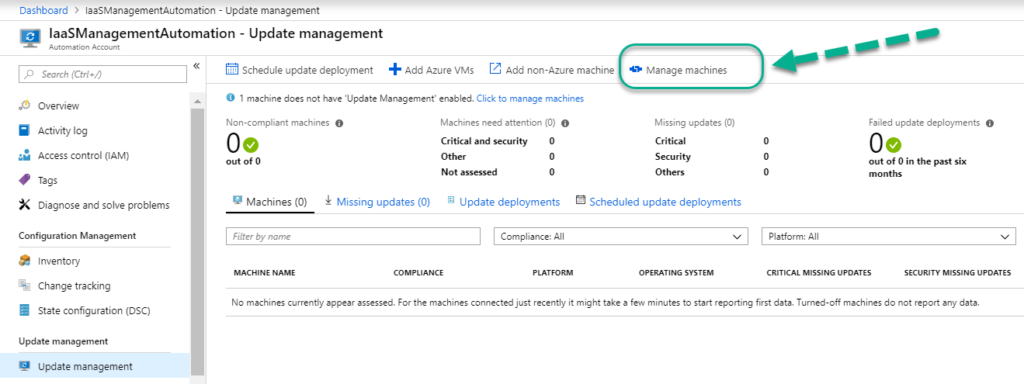
You are presented with 3 options
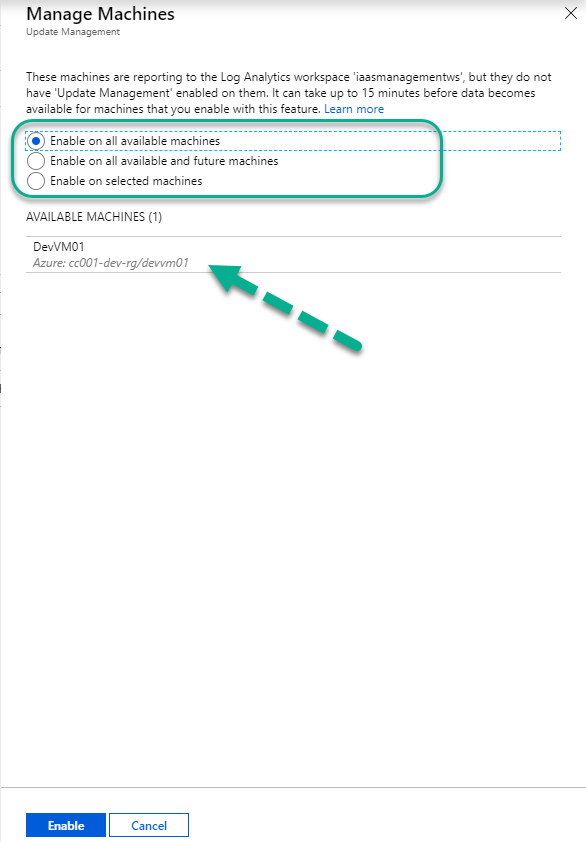
- Enable on all available machines: This means all machines reporting to the workspace associated with the Update Management (In this example only 1 VM is available in this mode)
- Enable on all available and future machines: The available machines and any new machines added to the workspace will automatically be enabled.
- Enable on selected machines: You manually select machines from the available list
Select the first option and click enable.
There are two alternative options you can also use; from the VM blade or select + Add Azure VMs
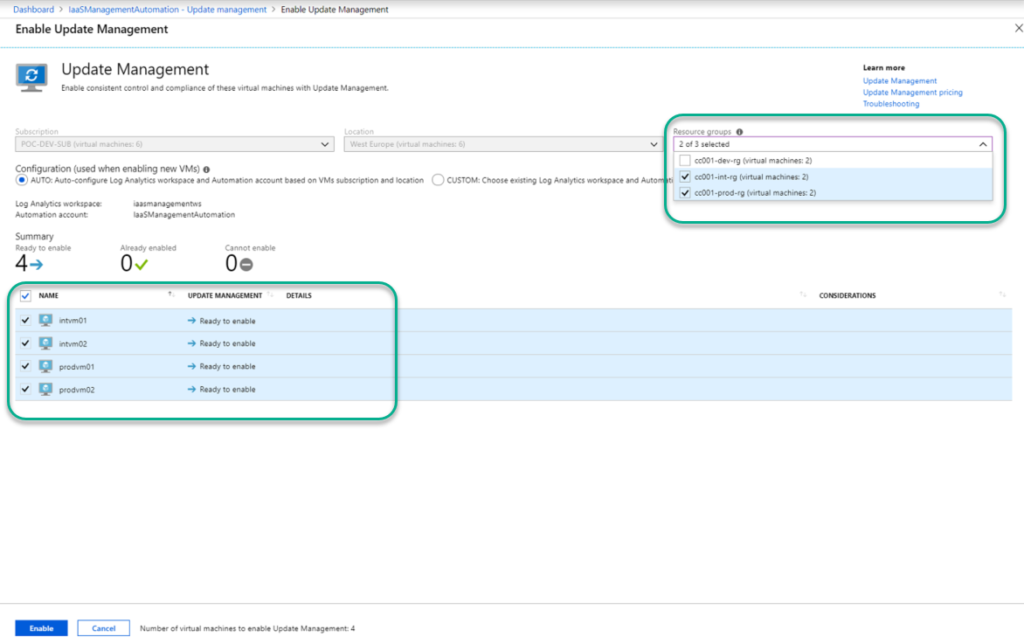
When you use this option ( + Add Azure VMs ), you see all VMs available by resource group. You can filter by unchecking one or more resource groups or by selecting individual VMs. Make your preferred selection and click Enable when done.
The process can take up to 15 minutes or more so be patient (in fact go and have a break, you have earned it).
Compliance data for the virtual machines or physical machines in update management can take up to 24 hours to show up in the Azure portal. During the initial assessment phase the compliance status will show as “not assessed” in the Azure portal.

Non-Azure Virtual Machines
The process to install/enable the agent on non-azure VMs is as follow:
Download the Windows/Linux microsoft monitoring agent from the Log Analytics workspace
Note the Workspace ID and workspace primary key, Install the agent and connect it to the workpace using the Log Analytics tab. If you already have SCOM deployed in your environment, you can multi-home the agent by adding the workspace ID and key. I blogged about the steps a while back and you can find the details here
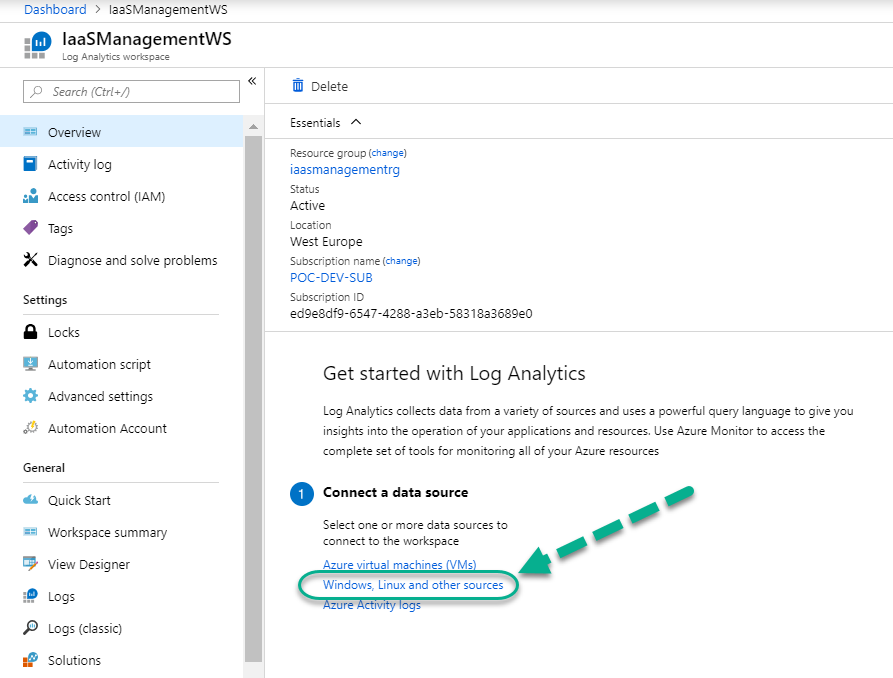
Navigating to the data source (download file) and workspace details has changed since Log Analytics moved into the Azure Portal. You will need to open the Log Analytics blade and navigate to Connect a data source and click the link Windows, Linux and other sources.
In the Connected Sources, select the relevant source type to get the download and workspace details required to complete the installation and link to the work space.
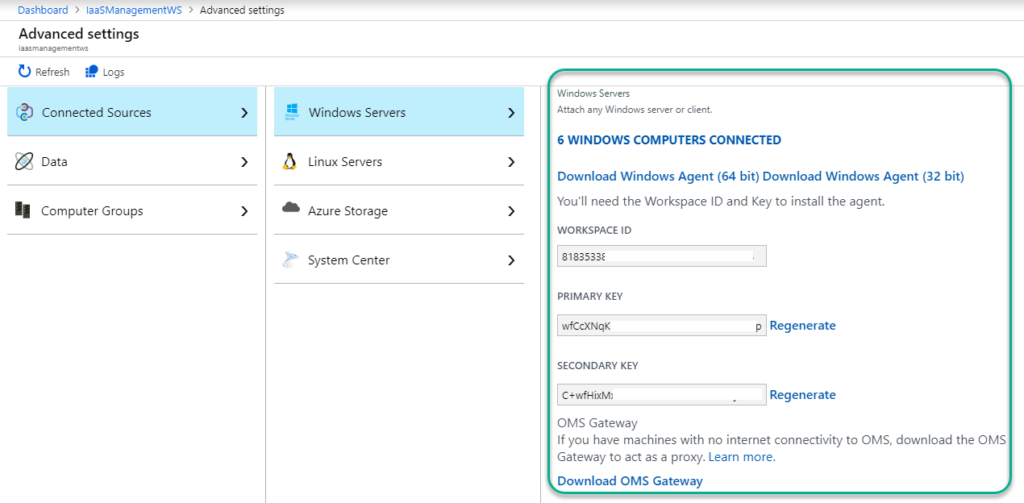
Once you install the Microsoft Monitoring Agent and apply the workspace details to a non-azure VM it is linked to the update management solution associated with that Log Analytics workspace. It is just a matter of waiting for the process to complete and the machines become visible and ready to manage using the same steps you followed to enable Azure VMs (Manage Machines | Enable on selected machines). You are now able to see all the machines including your non-azure machines with details of compliance states.

About Scan frequency
Windows
Scan runs twice a day
Every 15 minutes, the Windows API is called to query for the last update time to determine if the status has changed. If so, a compliance scan starts.
Linux
Scan runs every 3 hours.
It can take 30 minutes to 6 hours for the dashboard to display updated data from managed computers.
About pricing
| Capability | Meter | Free units included (per month) | Price |
| Update Management | Any node | N/A | Free* |
*You pay for log data stored in the Azure Log Analytics service. Detailed pricing.
Summary
Enabling Azure Update management, Inventory and Change tracking is significantly simpler than tradition tools used for this purpose. You can now assess and explore the scenarios and use cases for using this Azure service. Examples include but are not limited to reduction of infrastructure, workgroup machines and Linux machines.
I will share how to setup deployments and update management scenarios in future blogs. In the meantime be an IT scientist and experiment (safely) to learn more about this valuable service.
More information on updates management can be found here
