The latest addition to the System Center suite of products requires a change in mind set and approach to unleash the value and benefits to organisations who invest in it.
In this blog we will explore
The connection between frameworks and how we work
How to make frameworks like ITIL and MOF work for you
An introduction to the Administration node in SCSM Console and the business functions behind the node.
Frameworks and how we work
I received an expensive photo frame as a gift. 
The colour, quality and dimensions were just right. This would be perfect for the lounge. As excited as I was, I knew I had a major challenge ; I had hundreds of digital pictures on my computer and phones that would need to be printed ;
Which would be my favourite picture
Right size of pictures
Manually swap the pictures out or use the same picture but which one?
Printing cost – photographic shop or expensive printer and photographic printer paper?
Use my new static photo frame as a guide on dimensions for a digital photo frame
Get a digital frame of the same dimension
Result
Display multiple pictures, sort by occasion and significantly reduce my cost.
SCSM – Making frameworks like ITIL and MOF work fork you
ITIL is an international framework which enables an organisation to address the challenge of providing excellent services without high costs. MOF is Microsoft’s framework for achieving the same result. ITIL does not state specific technology however, MOF is aligned with the Microsoft products that enable organisations to adopt and adapt both frameworks.
More on MOF here and ITIL here
Microsoft System Center Service Manager provides you the ability to apply ITIL and MOF frameworks in a digital photo album framework style, instead of, the traditional static photo frame style which has hidden costs and flexibility challenges.
Let me unpack this for you
Static frame type products require on-going customisation that introduces cost, e.g. cut the picture to fit the framework; modify the frame to fit the picture.
SCSM is built for customization – save your picture in multiple formats and sizes, preview before displaying and transport with ease, at a lower investment with great returns
Real work introduction to SCSM
To get the value of SCSM let us start with a foundation and build our ITIL/MOF processes on this core area of the product.
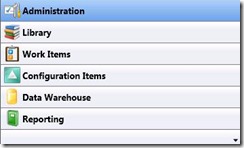
When you complete the installation of SCSM you are introduced to the SCSM console
So where do you start?
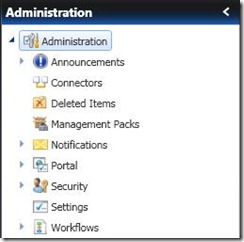
In this section we will explore the Administration node
Announcements
Used to communicate proactive messages to organisation. Messages can be configured to expire automatically, priority assigned and role based security is applied to control quality of messages.
Active announcements are the announcements that have not expired (as set by the SCSM administrative user)
Connectors
![]() This node is used to create connectors to other systems like Active directory, SCCM , OpsMgr and other 3rd Party Systems
This node is used to create connectors to other systems like Active directory, SCCM , OpsMgr and other 3rd Party Systems
We can also use the CSV connector to upload data into SCSM
We will discuss connectors in detail in a future bog
Deleted Items
SCSM objects that have been deleted (first phase deletion – similar to a recycle bin).
Once an object is deleted from the Deleted Items, it is removed from the Service Manager database
Management Packs (MPs)
SCSM container or bucket for the default objects and how they are configured. Similar to OpsMgr MPs
There are 2 types , sealed and unsealed
Sealed = Read only and signed by you or the supplier of the MP to guarantee author source
Unsealed = Read /write. You can do a Save As on a sealed read only MP (i.e. export and then modify)
MPs are created and configured in a number of tools. The default for the SCSM administrator is the SCSM Authoring Tool (stand-alone and external to the console) and also within the SCSM Administrative console. Advanced developer type customisations to extend the product are typically performed in Visual Studio and similar tools.
Any customisation you make in the SCSM Administrative console needs to be stored in an MP, as most of the default MPs are sealed you need to create an MP for your customisations. The Authoring Tool has much more customisation functions and also extends the types of customisation that can be performed in the console in a controlled environment.
The MPs are the differentiator of SCSM from other products when it comes to customisation
Your customisation is stored in the portable container (MPs)
Move your customisations from development to production in a controlled manner
Share your customisations with other instances and also preserve during upgrades without the need for re-engineering costs.
Notifications
This where we configure foundation settings for notifications in other parts of SCSM Administration Console
Channels – the channel (SMTP infrastructure settings, default recipient etc.) for your notifications are configured here.
The first step in enabling email workflows (more on this in future blogs)
Subscription – who should we send notifications based on the workflow activity e.g. when a ticket is created for a queue or assigned to an individual.
Templates – preconfigured messages for your subscriptions, you are provided with default templates which you can copy and modify. You can also create your own (store it in an MP for portability).
Portal
 This is where you customise the portal settings
Service Desk – Phone Number, email and Chat URL with their expected response times
What applications are published for users of the portal (has a dependency on the SCCM connector)
Automated Software Deployment workflow for users when they request published software (depends on the SCCM Connector and SCCM configured to allow the creation of deployment objects)
Security
 Run As Accounts – connector and service manager controlled user accounts are configured and stored here. Examples include the installation accounts, Active Directory connector account etc. This will vary by environment (refer to the SCSM documentation for best practise guidance).
User Roles – Where we configure role based security settings; who has access to do what and what objects do they have access to do what on.
Settings
![]() Configure general settings here like
Configure general settings here like
Incident ticket Prefix (default is IRxxx where xxx = sequence of numbers incremented with each new ticket)), Change Request Prefix (default is CRxxx where xxx = sequence of numbers incremented with each new change request) , Priority calculation matrix and your custom resolution time settings for incidents are all the types of settings configured here.
OpsMgr URL (part of OpsMgr integration)
Workflows
 This is where we use the guidance from our frameworks like ITIL, MOF and also how our organisation really works to automate the associated processes. Examples include
Routing tickets to a different team (SCSM term is Tier) based on the priority of a ticket or a category (e.g. Messaging category tickets get assigned to the messaging team and also moved to the messaging Queue (more on Queues in a future blog)
Configuration – Where we make configuration changes to the workflow (NB Workflows we create in the SCSM Authoring Tool will be displayed where once we have imported the relevant MP into the SCSM console).
Status – View the status of your workflows once they have been executed as specified in the specific workflow.
Bringing it all together
In this blog we explored the connection between industry standard frameworks and how we really work. We also discussed how SCSM allows you to bridge the gap between the frameworks and how we really work in our respective environment.
Finally we explored the Administration node of the SCSM console, providing a general explanation of the sub-nodes and their functions.
The detailed step by step guides for the SCSM can be found here . We will discuss other parts of the console in future blogs.


